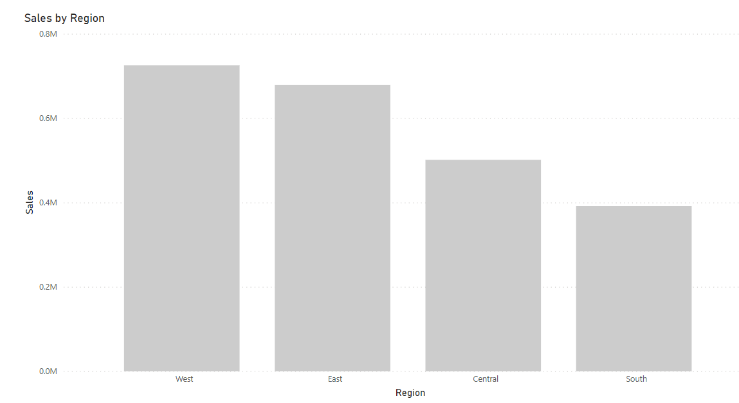
Row-Level Security (RLS), in the context of Power BI, refers to limiting the rows of data that a specific user can see when viewing a report. This allows you to better control what users can see in the published report based on their Power BI login account. For example, using this technique, a regional manager can view data for his region but not data for other regional managers. Thanks to this approach to data protection, it is possible to publish a single report or dashboard (we manage and maintain only one report then) instead of several identical ones supplied with a different set of data.
Table of content:
1.Power BI – general information
3.3.Difference between static and dynamic RLS in Power BI
Consider TTMS as Your Trusted Partner in Power BI
1. Power BI – general information
Power BI is a robust and versatile business intelligence and data visualization tool developed by Microsoft. It enables organizations to transform raw data into meaningful insights, empowering users to make informed decisions. With its intuitive interface and robust analytical capabilities, Power BI allows users to connect to various data sources, create interactive reports and dashboards, and share them securely across the organization. The platform offers a range of advanced features, including data modeling, data cleansing, and advanced analytics, enabling users to uncover hidden patterns, trends, and correlations in their data. With its cloud-based Power BI service, users can access and collaborate on reports and dashboards from anywhere, on any device. Power BI has gained popularity for its user-friendly interface, extensive integration capabilities with other Microsoft products, and vibrant community that contributes to its continuous development and expansion.
2. Security in Power BI
Security is a paramount aspect of Power BI, ensuring the protection and confidentiality of data within the platform. Power BI offers robust security features to safeguard sensitive information and control access to reports and dashboards. It provides granular security controls, such as Row-Level Security (Microsoft RLS), which allow organizations to restrict data visibility based on user roles and responsibilities. Additionally, Power BI incorporates role-based access controls (RBAC), enabling administrators to define and manage user permissions at different levels, ensuring that only authorized individuals can view and interact with specific data. Power BI also supports secure data connections, encryption in transit and at rest, and compliance with industry-standard security certifications, such as ISO 27001 and GDPR. Microsoft, as the provider of Power BI, has a strong commitment to data security and privacy, regularly updating and enhancing its security measures to address emerging threats and vulnerabilities. This focus on security instills confidence in organizations using Power BI to handle their sensitive data.
3. Types of RLS in Power BI
There are different methods of using RLS with the Power BI service. You can configure row-level security Power BI as plain, so-called. static RLS or dynamic RLS.
3.1 Static RLS
Static RLS, also known as “Row-Level Security,” is a powerful feature in Power BI that enables organizations to implement fine-grained access control at the row level. With Power BI’s static RLS, security logic is defined within the Power BI (.pbix) file itself during the RLS (RLS PBI) implementation process. This security logic involves creating roles with expressions that filter the data based on specific conditions.
Static RLS allows administrators to define security roles that determine which rows of data a particular user can access and view. These roles are associated with conditions or filters that limit the data based on user attributes, such as department, region, or any other relevant criteria.
By configuring static RLS, organizations can ensure that each user only sees the subset of data that they are authorized to access, thus maintaining a high level of data security and confidentiality. The static RLS rules are embedded in the Power BI file, and any changes to the security logic require modifying the PBIX file, saving it, and republishing it.
Implementing static RLS in Power BI (RLS Power BI) allows for centralized management of Power BI security roles, ensuring consistency across reports and dashboards. It streamlines the process of maintaining and updating security rules, as changes made to the roles can be applied universally to all reports that leverage those roles.
Static RLS provides a robust mechanism for enforcing row-level security within Power BI, enabling organizations to control data access based on predefined rules and ensuring that sensitive information remains protected.
3.2 Dynamic RLS
Dynamic RLS, also known as “Dynamic Row-Level Security,” is another powerful feature in Power BI that allows organizations to implement data access controls based on user attributes stored within the data itself. With dynamic RLS, the security definition is created in connection with the user account information already present in the data tables.
In dynamic RLS, the security logic is not defined within the Power BI file, but rather in additional tables that are loaded into the data model. These tables contain user login information and the corresponding data attributes that determine their access rights. The user login information can be sourced from various sources such as Active Directory or SharePoint lists.
When a user accesses the Power BI report or dashboard, Power BI dynamically applies the RLS rules based on the user’s credentials. By leveraging functions such as USERNAME() or UserPrincipalName() in Data Analysis Expressions (DAX), the dynamic RLS tables are used to filter the data and ensure that users can only view the relevant rows based on their attributes.
The flexibility of dynamic RLS allows for easier updates and maintenance of security rules. To modify the security logic, administrators can simply add, edit, or delete records in the associated tables, without the need to modify and republish the Power BI file.
Dynamic RLS is particularly useful in scenarios where the data attributes or user access rights frequently change. For example, if the data contains sales information for different territories, dynamic RLS can dynamically filter the data based on the user’s assigned territory, ensuring that they only see the relevant sales data.
Implementing dynamic RLS requires the creation of tables that store user attributes and their associated data access permissions. Relationships between these tables and the fact tables containing the actual data are established to enable proper filtering.
By leveraging dynamic RLS, organizations can ensure that users only see the data that is relevant to them, based on their attributes stored in the data. This provides a flexible and efficient way to enforce row-level security in Power BI (Row level security pbi), minimizing manual intervention and maintaining data confidentiality and integrity.
3.3 Difference between static and dynamic RLS in Power BI
The main difference lies in how the security logic is defined and updated.
Static RLS – that also answers a question “what is row level security?”, involves defining the security logic within the Power BI (.pbix) file itself during the Power BI RLS implementation process. Roles with expressions or filters are created within the file to determine which rows of data a specific user can access. Any changes to the security logic require modifying the PBIX file, saving it, and republishing it. Static RLS provides a straightforward approach to data protection and is suitable for scenarios where security rules remain relatively static.
On the other hand, dynamic RLS, also known as Dynamic Row-Level Security, relies on the security definition created in connection with the user account information stored in the data tables. Dynamic RLS does not involve modifying the Power BI file for security updates. Instead, additional tables are loaded into the data model that contains user login information and associated data attributes. Functions like USERNAME() or UserPrincipalName() are used to filter the data dynamically based on the user’s credentials. Changes to the security logic in dynamic RLS can be made by adding, editing, or deleting records in the associated tables. Dynamic RLS offers greater flexibility and ease of maintenance compared to static RLS.
In terms of implementation, static RLS requires changes to the Power BI file itself, while dynamic RLS leverages external tables to determine row-level security (RLS) with Power BI. Static RLS provides centralized management of security roles, ensuring consistency across reports and dashboards. However, updates to the security logic require modifying and republishing the PBIX file. On the other hand, dynamic RLS allows for easier updates as changes are made directly in the associated tables without the need to modify the Power BI file.
Both static and dynamic RLS enable organizations to enforce data access controls and restrict the visibility of data based on user roles and attributes. The choice between static and dynamic RLS depends on the specific requirements of the organization, the frequency of security updates, and the level of flexibility needed in managing the security rules. Static RLS means that we define security logic, in the form of roles assigned to a data filtering expression in the Power BI file (.pbix), and for each logic change we have to open the PBIX file, apply the change, save the file and republish it.
Dynamic RLS, on the other hand, relies on a security definition created in association with the user account in the data itself. It doesn’t sound very interesting yet, so let’s focus on a specific example.
When person X logs into the system, we can read from the data tables that are loaded additionally to the model that this person should only have access to specific invoices. In the dynamic RLS table that we have created, we have an associated user login with individual invoice IDs. This method is possible in the Power BI service using the UserName () or UserPrincipalName () DAX functions. In dynamic RLS, therefore, to change the logic, it is enough to add / edit / delete records in tables. That’s all!
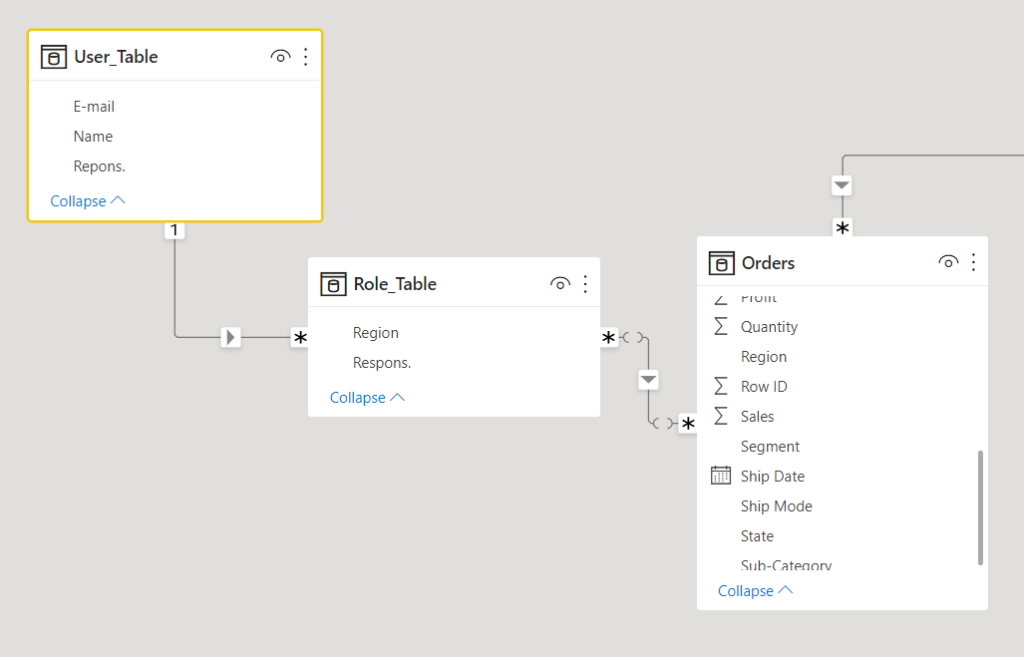
However, before we follow the process of creating dynamic RLS, let’s first summarize – to define dynamic RLS and security roles, you need: user table with login ID and group to which they belong, role table, appropriate relationships (user table filters the role table, and this one filters the table facts), at least one role with a DAX filter with UserName and UserPrincipalName functions.
4. RLS Management Power BI
RLS Management in Power BI involves effectively implementing and maintaining Row-Level Security to control data access based on user roles and attributes. With RLS, organizations can ensure that users only see the data that is relevant to them, while maintaining a high level of data protection and confidentiality.
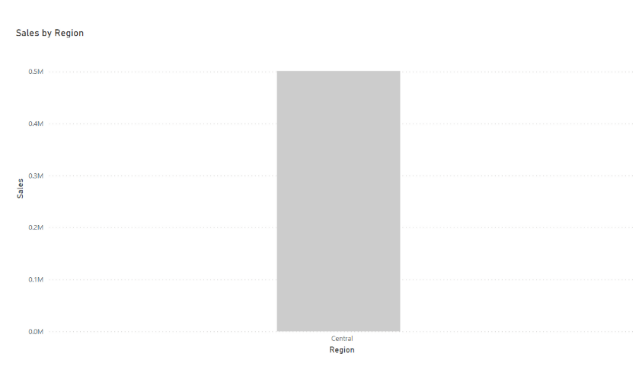
For example, consider a scenario where a Power BI report contains data for multiple regions. By implementing RLS, a regional manager can be granted access to view data specific to their region, while being restricted from accessing data for other regional managers. This approach streamlines data protection by enabling the publication of a single report or dashboard that can be managed and maintained centrally, eliminating the need for multiple reports with different datasets.
Power BI provides the necessary tools and features to manage RLS efficiently. Administrators can define security roles and associated filters to control data visibility. The Power BI service allows for the centralized administration of security roles, providing a comprehensive overview of the roles implemented within the organization.
Additionally, Power BI offers capabilities for auditing and monitoring RLS usage and effectiveness. This helps administrators track and analyze access patterns, identify any potential security gaps, and ensure compliance with data protection regulations.
To effectively manage RLS, administrators can leverage resources provided by Microsoft, such as the Power BI documentation on RLS management. The documentation offers guidance on implementing RLS, creating security roles, and managing access levels based on user attributes and roles.
By implementing RLS management in Power BI, organizations can enforce data access controls, ensure the appropriate level of security, and provide users with access to the data they need to make informed decisions while maintaining data confidentiality.
Only users (preferably domain groups) should be assigned to such a defined role on the portal – from that moment on, a user in such a role will not see any rows other than those that meet the condition of the role. However, beware – the participation of a given user in more than one role at the same time may result in the disclosure of all data! Therefore, the report and the assumed roles should be tested well.

4.1 Table of users
For dynamic RL to work, you must create a table of all users. This table must list all users with the field as their login ID for the Power BI report and the group that the user belongs to. The table can come from e.g. Active Directory or Sharepoint list.
If the report is hosted on the Power BI service, the sign-in is the email address users use to sign in to Power BI. If the report is hosted on Power BI Report Server, the login is the network account that is used to sign in to the report server.
Sample table:
4.2 Role table:
Then we move on to the problem of creating roles that can filter data based on user group. We need to create a table that holds all the associations.
Sometimes the role table is not required. The user table can act as a role table.
For example, if we are implementing a Power BI payroll report, we want each user to see only their personal data.
4.3 Relations
Now we need to link this table to both the users table and the actual fact table. It is important that the role table filters other tables in the Data Model. Filtering between tables in Power BI is defined as a relationship. We need to have a relationship with proper direction to other data tables in the role table data model.
4.4 DAX Filters
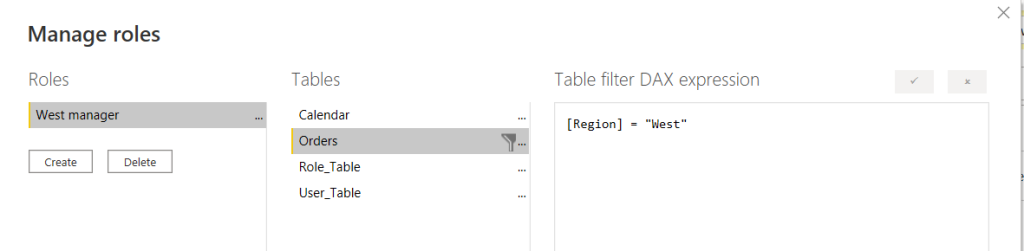
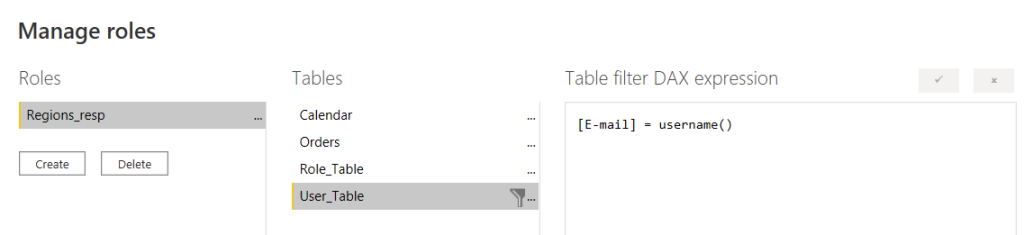
The last element is associating the current user with mail. This can be achieved by creating a role:
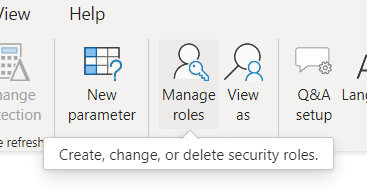
In the “user” table, we add the following DAX expression (username () gets the credentials of the logging in user):
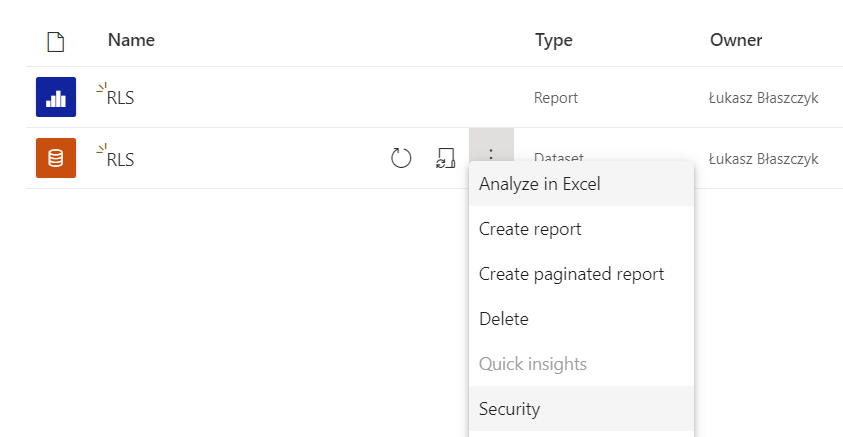
After publishing the report, open the security menu of the given data set.
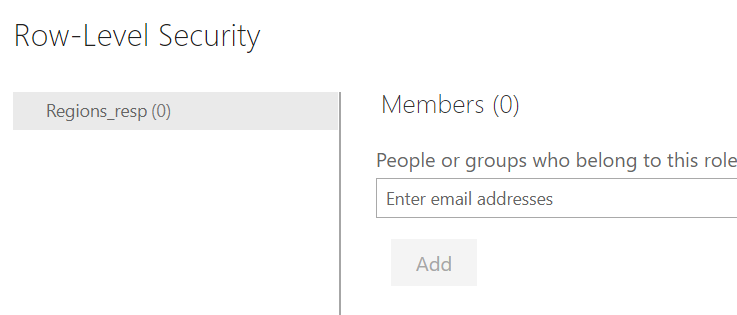
At this stage, we need to connect the role created in Power BI Desktop with the users of the powerbi.com service. Click Add and Save.
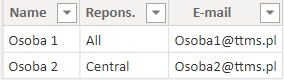
In summary, the user’s login credentials will filter the user table, this will in turn filter the roles table, which in turn will filter the relevant data in the fact table:
Person 1:
Person 2:
Consider TTMS as Your Trusted Partner in Power BI
Consider Transition Technologies MS (TTMS) as your trusted partner in Power BI. TTMS is a renowned provider of technology solutions, with a strong expertise in Power BI and data management. With a proven track record of successful projects, TTMS has gained the trust of clients worldwide.
TTMS collaborates closely with Microsoft, ensuring a deep understanding of Power BI and its advanced features, including Row-Level Security (RLS) implementation. As a Microsoft partner, TTMS stays up-to-date with the latest developments in Power BI, ensuring that clients receive cutting-edge solutions that meet their specific needs.
When choosing TTMS as your Webcon provider for Power BI, you benefit from their extensive experience and domain knowledge. TTMS offers a dedicated Webcon team that specializes in implementing secure and efficient Power BI solutions, including RLS. The Webcon team collaborates closely with clients to understand their requirements and design tailored solutions that address their unique challenges.
TTMS provides a wide range of services to support your Power BI journey, from initial implementation to ongoing support and maintenance. Their services encompass data modeling, report design, RLS implementation, and security roles management. With TTMS’s expertise in Power BI and RLS, you can ensure the seamless integration of row-level security in your Power BI projects.
To learn more about TTMS’s Power BI services, visit their services page, where you can explore their offerings, including Power BI Managed Services. TTMS’s Power BI Managed Services provide comprehensive support, ensuring the smooth operation of your Power BI environment, including RLS management, data governance, and performance optimization.
Choose TTMS as your trusted partner for Power BI, and you’ll benefit from their deep expertise, collaboration with Microsoft, dedicated Webcon team, and comprehensive services. Trust TTMS to deliver secure, efficient, and tailored Power BI solutions that help you unlock the full potential of your data.
Final thoughts
In conclusion, Power BI is a powerful business intelligence tool that empowers organizations to transform data into actionable insights. With its intuitive interface, advanced analytics capabilities, and cloud-based service, Power BI offers a comprehensive solution for data visualization and analysis. The platform’s commitment to security is evident through features like Row-Level Security (RLS), which enable organizations to control data access based on user roles and responsibilities. Whether through static RLS, which defines security logic within the Power BI file, or dynamic RLS, which leverages user attributes stored in the data, organizations can enforce granular security measures. Managing RLS PBI ensures that users only have access to relevant data, promoting data confidentiality and integrity. Moreover, partnering with Transition Technologies MS (TTMS), a trusted provider with expertise in Power BI and RLS implementation, offers organizations a reliable solution. TTMS collaborates closely with Microsoft, providing cutting-edge solutions and a dedicated Webcon team to address specific requirements. With TTMS’s range of services, including Power BI Managed Services, organizations can effectively manage RLS and unlock the full potential of Power BI in their data-driven journey.
Łukasz Błaszczyk – BI Developer in Transition Technologies MS